How I Organized My Fridge With $1 Store Items
Hey, let’s get your fridge in order with just a few bucks! Head to your local $1 store and grab clear bins, stackable trays, and adhesive hooks. These simple tools can transform chaos into a neat system. Start by emptying your fridge to see what you’ve got. Curious about the next steps to maximize space and keep things fresh? Stick around for the full plan!
Key Takeaways
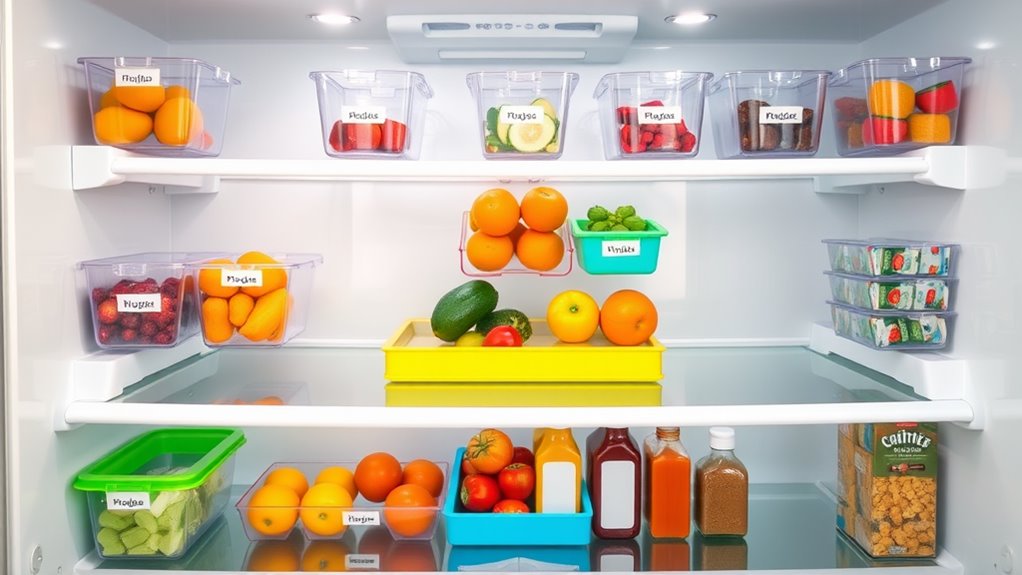
- I bought clear plastic bins and dividers from the dollar store for under $10 to start organizing my fridge.
- I used stackable trays and small baskets to group similar foods like dairy and fruits in designated spots.
- I applied reusable labels from the dollar store to mark storage zones for easy identification.
- I placed adhesive hooks inside the fridge door to hang lightweight items, maximizing space.
- I maintained neatness by using dollar store dividers to separate items and prevent clutter buildup.
Gathering Affordable Tools for Fridge Organization
How can you transform your fridge into an organized haven without breaking the bank?
Start by setting a fridge organization budget—aim for under $10.
Head to your local dollar store and grab affordable tools like clear plastic bins, stackable trays, and small baskets.
Look for adhesive hooks to hang lightweight items on the fridge door.
Pick up reusable labels to mark storage zones.
These items are cheap, durable, and perfect for maximizing space.
Before buying, measure your fridge shelves to ensure everything fits.
With these simple purchases, you’ll kickstart an efficient, budget-friendly fridge organization system.
Decluttering your fridge with these tools can also maximize space efficiently.
Sorting and Categorizing Food Items
Start by grouping similar foods together in your fridge to create a clear system, such as keeping all dairy on one shelf and fruits in a designated bin.
Next, use labels on storage areas to mark where each category belongs, ensuring you can quickly find items and maintain order.
Grab some adhesive labels or masking tape from the dollar store to make this step affordable and effective.
This simple hack can transform even the most chaotic fridge into a neatly arranged space in just minutes.
Grouping Similar Foods
After clearing out your fridge, dive into grouping similar foods to streamline your storage system.
Start by gathering all dairy items—milk, cheese, yogurt—and place them together on one shelf.
Next, cluster fruits and vegetables in separate bins or drawers for easy access.
Keep meats and seafood in a distinct section, ideally on the bottom shelf to prevent drips.
Group condiments and sauces in a door rack or small tray.
Finally, bundle snacks and leftovers in clear containers for quick grabs.
This methodical approach ensures you’ll find what you need fast and keep everything organized.
Labeling Storage Areas
Dive into labeling your fridge storage areas to maintain the organization you’ve created. Grab some $1 store labels or masking tape and a marker. Clearly mark each zone for specific food types to avoid mix-ups.
Use this guide to assign spots:
| Area | Food Type | Shelf/Drawer |
|---|---|---|
| Top Shelf | Dairy Products | Upper Level |
| Middle Shelf | Leftovers | Central Level |
| Bottom Shelf | Raw Meats | Lower Level |
| Door Compartments | Condiments | Side Storage |
Stick labels on bins or shelves. You’ll find items faster, reduce waste, and keep chaos at bay with this simple step.
Utilizing Stackable Containers for Space Efficiency
How can you maximize every inch of your fridge space?
Start by grabbing stackable containers from the dollar store.
These affordable gems let you build upwards, turning wasted vertical space into storage gold.
Sort items like yogurt cups, cheese slices, or fruit packs into separate containers.
Stack them neatly on shelves, ensuring heavier items sit at the bottom for stability.
Check that lids snap tight to prevent spills.
Arrange containers by size or type for quick access.
You’ll see clutter vanish as everything fits snugly, freeing up room for more groceries without cramming or chaos.
This approach also helps with reducing food waste by keeping items visible and accessible.
Labeling Shelves for Easy Access
When labeling your fridge shelves for easy access, start by choosing clear labels that describe contents precisely, like “Dairy” or “Leftovers,” using dollar store stickers or tags.
Make sure you position these labels on the front edge of each shelf for maximum visibility, so you can spot them at a glance without rearranging items.
Don’t forget to update the labels regularly as your fridge contents change, ensuring you always know what’s where with minimal effort.
This simple hack can transform your refrigerator in just five minutes, making food items easier to find and reducing waste.
Choosing Clear Labels
Ever wondered why some fridges seem effortlessly organized?
It’s all about choosing clear labels for your shelves.
You’ve gotta make sure each label stands out and instantly tells you what’s where.
Grab some affordable label makers or printable stickers from the dollar store, and get started.
Here’s how to do it right:
- Use bold, legible fonts for quick reading.
- Pick waterproof materials to withstand fridge moisture.
- Stick to short, specific descriptions like “Dairy” or “Leftovers.”
With clear labels, you’ll save time and avoid rummaging.
Keep them consistent, and your fridge will stay systematically neat and accessible.
Positioning for Visibility
Start by strategically placing your labels on fridge shelves to maximize visibility and ensure easy access.
Stick them on the front edge of each shelf, facing outward, so you can spot them instantly when opening the door.
Use consistent positioning—place labels on the left side for uniformity.
Ensure they’re at eye level for quick reading, especially on middle shelves.
If a shelf holds multiple categories, divide it with small labeled zones.
Check that no containers or items block the labels.
This setup helps you find what you need fast, keeping your fridge organized and stress-free.
Updating Labels Regularly
Regularly updating your fridge labels keeps your organization system current and functional.
As your fridge contents change, so should your labels to avoid confusion and maintain order.
Set a weekly reminder to review and revise them, ensuring they reflect what’s actually on each shelf.
Here’s how to stay on top of it:
- Check Expiry Dates: Discard outdated items and update labels accordingly.
- Reorganize as Needed: Shift labels if you rearrange categories or shelves.
- Use Clear Handwriting: Ensure labels remain legible with bold, easy-to-read text.
This quick habit prevents chaos and keeps your fridge accessible and efficient.
Arranging Drawers With Budget Dividers
Precision is key when tackling fridge drawer organization with budget dividers from the dollar store. Grab a variety of sizes to fit your drawers snugly. Start by emptying each drawer, then measure the space to place dividers effectively. Categorize items like fruits, veggies, and cheeses, assigning each a specific section. For an added touch of freshness, consider making a DIY fridge deodorizer to keep odors at bay.
Use this table to plan your layout:
| Drawer Section | Assigned Items |
|---|---|
| Left Side | Fruits |
| Middle | Vegetables |
| Right Side | Cheeses |
Install the dividers, slot items in, and adjust as needed. You’ll see instant order with minimal cost!
Maintaining Order With Regular Cleanups
Often, the key to a consistently organized fridge lies in scheduling routine cleanups.
Set a specific day each week to tidy up, ensuring you don’t let clutter build.
Take everything out, wipe down shelves with a damp cloth, and check expiration dates to toss spoiled items.
To streamline the process, focus on these steps:
- Sort items by category before placing them back.
- Discard leftovers older than three days to avoid odor.
- Reorganize containers using your dollar store dividers for neatness.
This habit keeps your fridge functional and prevents chaos from creeping in over time.
Additionally, consider a simple hack with fridge deodorizing methods to keep unpleasant smells at bay.