Remove Burnt-On Grease From Stovetop With This Trick
Have you ever struggled with stubborn burnt-on grease on your stovetop that just won’t budge? You’re not alone. This common kitchen headache can make even the cleanest space look unkempt. But don’t worry—there’s a simple, effective trick using everyday items to tackle this mess. Stick with me to uncover a method that’ll transform your stovetop without harsh chemicals or endless scrubbing.
Key Takeaways
- Protect hands with rubber gloves and ensure the stovetop is cool before cleaning.
- Sprinkle baking soda on burnt-on grease, then spray white vinegar to create a fizzing reaction.
- Let the mixture sit for 15-20 minutes to loosen stubborn grease effectively.
- Scrub gently with a non-abrasive pad, then wipe residue with a damp microfiber cloth.
- Dry the surface with a soft towel to prevent water spots and restore shine.
Understanding the Grease Challenge
How often have you stared at that stubborn, burnt-on grease coating your stovetop, wondering where to even start?
That crusty layer seems impossible to budge, baked on from countless meals.
You’ve likely scrubbed until your arms ached, only to see minimal results.
Understanding this grease challenge is the first step to conquering it.
Burnt-on grease bonds tightly to surfaces, resisting basic cleaning methods.
But don’t despair—there’s a grease removal hack that works wonders.
It targets the tough, sticky mess with precision, breaking it down effectively.
Stick with this approach, and you’ll see that daunting layer disappear.
This simple trick can effortlessly remove burnt-on grease with minimal effort.
Gathering Your Cleaning Supplies
Before tackling that burnt-on grease on your stovetop, make sure you’ve got the right tools and supplies ready.
Grab a pair of rubber gloves to protect your hands from harsh cleaners.
You’ll need a mild dish soap for general cleaning, white vinegar for natural degreasing power, and baking soda to tackle stubborn spots with its abrasive texture.
Keep a microfiber cloth or sponge handy for gentle scrubbing, and have a bucket or bowl for mixing solutions.
Finally, gather some paper towels for quick wipe-downs.
With these supplies, you’re equipped to handle that greasy mess effectively.
This simple trick can save you hours of cleaning and restore your kitchen’s shine.
Preparing the Stovetop Surface
Start by ensuring your stovetop is completely cool to avoid any risk of burns or damage. You don’t want to handle a hot surface, so give it ample time to cool down after use.
Next, remove any loose debris or crumbs with a dry cloth or soft brush. This prevents scratching the surface during cleaning.
If there are removable parts like grates or drip pans, take them off and set them aside for separate cleaning.
Finally, wipe down the stovetop with a damp cloth to clear any surface dust or residue before moving forward.
For a quick and effective solution, try this 2-minute cleaning hack to tackle greasy buildup effortlessly.
Applying the Special Cleaning Mixture
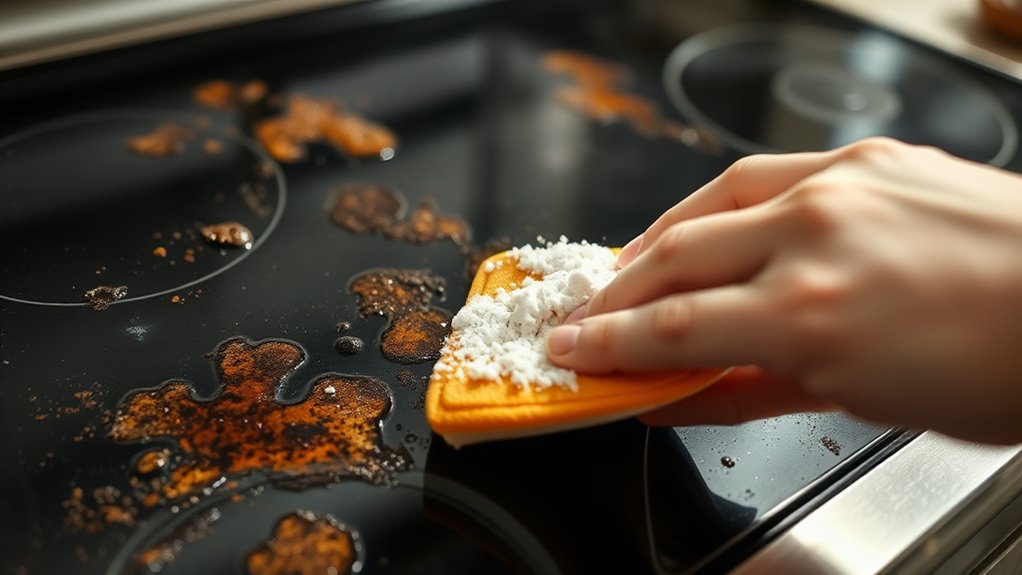
After getting your stovetop prepped and cleared of loose debris, it’s time to tackle the burnt-on grease with a targeted cleaning mixture. Grab a small bowl and mix equal parts baking soda and dish soap to form a thick paste. Apply this directly to the greasy spots using a soft sponge or cloth, ensuring you cover every stubborn stain. This method is a powerful no-scrub solution that effortlessly lifts tough grease without harsh scrubbing.
Check the table below for precise measurements based on stovetop size:
| Stovetop Size | Baking Soda & Dish Soap (each) |
|---|---|
| Small (2 burners) | 2 tablespoons |
| Medium (4 burners) | 4 tablespoons |
| Large (6 burners) | 6 tablespoons |
Letting the Solution Work Its Magic
Now that you’ve spread the cleaning mixture over the burnt-on grease on your stovetop, give it time to break down the stubborn mess.
Set a timer for about 15-20 minutes, allowing the solution to penetrate and loosen the grime without you lifting a finger.
You’ll soon notice the grease starting to dissolve, making the next step of wiping it away much easier.
This simple hack makes stovetop cleaning routine effortless and transforms your kitchen into a sparkling space.
Apply the Mixture
Grab your prepared cleaning mixture and spread it generously over the burnt-on grease on your stovetop.
Use a sponge or gloved hand to ensure even coverage, focusing on the toughest spots.
Work the paste into the grime with small, circular motions to help it penetrate the layers of grease.
Make sure you’ve coated every affected area, especially around burner edges where buildup often hides.
If the mixture seems too thick, add a tiny splash of water to make it spreadable.
Take your time with this step to ensure the solution can tackle the stubborn mess effectively.
Wait for Results
Once you’ve applied the cleaning mixture, let it sit on the stovetop for at least 15 to 30 minutes to break down the burnt-on grease. Don’t rush this step; the solution needs time to penetrate and loosen stubborn buildup. While waiting, avoid using the stove to prevent interference with the process.
Check the table below for optimal waiting times based on grease severity:
| Grease Level | Waiting Time | Notes |
|---|---|---|
| Light | 15 minutes | Minimal buildup |
| Moderate | 20-25 minutes | Typical spills |
| Heavy | 30 minutes | Thick, old grease |
| Extreme | 30+ minutes | May need reapplication |
Adjust accordingly for best results.
Watch Grease Dissolve
Observe the cleaning solution as it starts to break down the burnt-on grease during the waiting period. You’ll see the stubborn, crusty mess begin to soften as the solution penetrates deep into the layers. It’s satisfying to watch years of grime lose their grip without harsh scrubbing.
Feel the impact with these moments:
– Marvel at the grease bubbling away.
– Sigh with relief as stains fade.
– Anticipate a spotless stovetop soon.
– Rejoice in the effortless cleaning power.
– Feel proud of restoring your kitchen.
Keep an eye on it, ensuring the solution works its magic before wiping.
Scrubbing Away the Stubborn Stains
Now that the solution has softened the grease, grab a non-abrasive scrub pad or a stiff-bristled brush to tackle those tough, burnt-on stains with firm, circular motions.
Make sure you’ve got the right cleaning tools, like a microfiber cloth for wiping away residue, to ensure you don’t scratch your stovetop’s surface.
Lastly, take a moment to think about preventing future stains by wiping down spills immediately and using drip pans if your stove has them.
This effortless hack can make stovetop cleaning simple and transform the look of your appliance with minimal effort.
Tackling Tough Grease
How can you conquer the toughest burnt-on grease clinging to your stovetop?
Don’t let those stubborn stains intimidate you.
Start by softening the grease with a warm, damp cloth to loosen its grip.
Then, apply a potent grease-fighting solution, letting it sit for 10-15 minutes to break down the mess.
Feel the frustration melt away as you tackle this chore with determination using these emotional motivators:
- Imagine the relief of a spotless surface.
- Picture your kitchen shining like new.
- Savor the victory over grime.
- Feel pride in your hard work.
- Reclaim your stovetop’s glory!
Effective Cleaning Tools
Grab the right tools to scrub away those stubborn stains on your stovetop with ease.
Start with a non-abrasive scrub pad or sponge to avoid scratching the surface. Pair it with a microfiber cloth for wiping down residue.
For tougher spots, use a plastic scraper to gently lift burnt-on grease without damaging the finish. Keep a small brush handy for tight corners and edges around burners.
Make sure you’ve got a bucket or bowl for mixing cleaning solutions.
With these tools, you’ll tackle grime efficiently, restoring your stovetop’s shine without risking scratches or wear.
Preventing Future Stains
Often, the best way to keep your stovetop spotless is by preventing burnt-on grease before it becomes a problem.
You’ve got to act proactively, and it’s easier than you think with consistent habits.
A clean stovetop isn’t just aesthetics; it’s pride in your kitchen.
Protect it with these tips:
- Wipe spills immediately to avoid stubborn stains.
- Use drip pans to catch grease overflow.
- Cook on lower heat to minimize splatters.
- Cover pots to trap messy boil-overs.
- Schedule weekly cleanings to stay ahead.
Stick to these, and you’ll save time, effort, and keep your stovetop gleaming effortlessly.
Wiping Down for a Spotless Finish
Dive into the final step of cleaning your stovetop by wiping it down for a spotless finish.
Grab a clean, damp microfiber cloth to remove any leftover residue or cleaning solution. Wipe in small, circular motions to ensure you cover every inch, lifting off streaks or smudges.
Pay extra attention to corners and edges where grime hides. If you spot stubborn marks, dampen the cloth with a bit of vinegar for added power.
Finally, dry the surface with a soft, dry towel to prevent water spots and reveal a gleaming, pristine stovetop that looks brand new.
For effortless daily maintenance, incorporate a quick wipe-down after cooking to prevent grease buildup and keep your kitchen sparkling with minimal effort.